Hello everyone!
Yesterday I treated myself...
Now, I know that at £38 a pot this stuff isn't cheap. BUT!! I used it for a long time (before I decided not to afford it anymore) and it was just so luxurious on my skin.
I have combination skin (dry but oily and prone to breakouts), so I decided to give the Dr Nick Lowe skincare routine a go. It was their range for blemished skin in particular. But I found that it just dried me out, stripped out all the natural oils in my skin and frankly made me wrinkly!
This little lot was from Selfridges (the toner and cleanser were included in the price of the day cream) and although its a little splurge, I'm hoping for good results as I've used it before. There are lots of yummy skin ingredients like glycerol and hyraulonic acid for plumping and moisturising.
The lady at the counter gave me some little samples of their serum too, so I will be testing that to see how I get on!
My only reservation is that I have been using Simple skincare for a while now (to try and bring the cost down) so I hope my skin doesn't find this too rich.
But I'm so happy and looking forward to treating my skin again, and it smells heavenly too!
MUApril x
Thursday, 19 April 2012
Tuesday, 17 April 2012
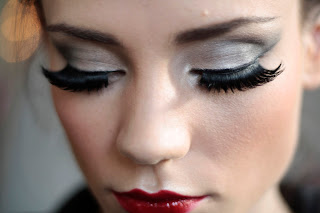
Brigitte Bardot Inspired
For this look I REALLY needed a jet black eyeshadow, the ones I had were coming out a bit silvery/bluey. So if anyone has any tips for a highly pigmented black/kohl eyeshadow do let me know!
I used two sets of eyelashes (bottom and top) to get that really sultry look. Josie is wearing a shirt from ZARA which gives the photos a 70s feel I think. But originally I wanted to create that Brigitte Bardot look, which is not overdone and a little bit messy. As a perfectionist that was a little tricky!
Lust List:
- Rich black eyeshadow
- Black ink gel eyeliner
I'll let you know what I find! Any tips/ideas just comment below!
MUApril x
Sunday, 1 April 2012
Creepy Experiment
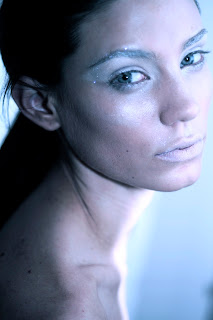
This is one of my first attempts at a 'fashion' look. I worked with Kitty to create an 'Ice Queen' look.
It was much harder than I thought to fade her eyebrows out! She has quite dark eyebrows and a light concealer just wasn't cutting the mustard. So next I tried dabbing the eyebrows with vaseline and patting on a white eyeshadow which worked a bit better but still wasn't giving me the bleached look I wanted. Finally I tried talc, and that seemed to work (if it became a little bit like a paste) so I covered the eyebrows and once they looked white enough I used a 'Too Faced' glitter over the top.
To create the sparkly lip I covered Kitty's lips in vaseline and pressed her lips into a pile of glitter. I used a Mac eyeshadow to highlight her cheekbones and the bridge of her nose which gives her that eery/skeletal look.
Let me know what you think!
MUApril x
Hen Do Season!
Hi guys!
I don't know about you but I have a few hen-dos coming up and I just wanted to show you a look I did for my friend last year. We were dressed as fairies/butterflies:
As you can see it is quite experimental and I used lots of colour to make a pretty fairy-like pattern. I actually used a blue metallic eyeliner pencil with a blue sparkly liquid eyeliner over the top! I think it looks pretty good, and it lasted all night which is a bonus!
In a few weeks I am going on a hen-do dressed as a sheep (Bo-Peep and her sheep) so if anyone has any ideas about how to make that look pretty/sexy let me know!
Happy partying!
MUApril x
Friday, 23 March 2012
Monday, 19 March 2012
Kitty
I love these pics! This is such a natural look, but in reality the model (my friend Kitty) is wearing quite a bit of make-up. Photographs take away 40% of the make-up applied, so if you are attending an event where you know your photo will be taken I would always a little more than you first thought!
For example; the lipstick I used is a really lovely one by NARS called 'Tzigane', on the hand it comes out quite dark...
For the eyes I used quite a big eyeshadow blending brush to blend three colours (lightest first). I used my Bobbi Brown eyeshadow pallet which includes 'Hot Stone 56', 'Rich Brown 11', 'Bone 2'.
- First use the lightest colour - 'Hot Stone' in my case - all over the eyelid and socket up to the brow
- Use a highlighter for under the brow line - I used a MAC eyeshadow called 'Nylon'
- Next apply the middle colour - 'Bone' - into the eye socket and blend up and out towards the far edge of the eyebrow
- Use the darkest colour along the eyelashes and under the eye in the outer corner.
Hope this is useful, let me know if you need more explanation!
MUApril x
Sunday, 18 March 2012
Hannah
This is a 'smokey eye' look that is incredibly versatile and can be worn with a huge variety of colours and adapted for any eye/face shape.
It isn't a heavy smokey eye as I have used a primarily brown pallet with a black eye-line.
I would suggest this look for any special occasion, as it can be adapted so easily. Once you have the hang of the basic application technique you can play around with colours to match any outfit.
MUApril x
Lifesavers
Hey guys!
I thought I would start by telling you about my favourite products, and then post some looks and tell you how I created them.
There a few products that are my absolute essentials
1. Erase Paste by Benefit - Covers any blemish or dark spot whilst not highlighting it.
2. 'That Gal' Primer by Benefit - Great for prepping the skin for make-up application, creamy and light.
3. NARS Bronzer in 'Laguna' - A lovely soft bronzer which is great for contouring (smells great too!)
4. Diorshow Blackout Mascara by Dior - SO black and great for creating volume and length.
MUApril x
Subscribe to:
Posts (Atom)


